网络框架 OKHttp get 和 post 以及 Gson 的简单使用
- Android 在 6.0 之后也将内部的 HttpUrlConnection 的默认实现替换成了 OkHttp
1.特点:
- 同时支持 HTTP1.1 与支持 HTTP2.0
- 同时支持同步与异步请求
- 无缝支持 HTTP/2
- 同时具备 HTTP 与 WebSocket 功能
- 拥有自动维护的 socket 连接池,减少握手次数
- 拥有队列线程池,轻松写并发
- 拥有 Interceptors(拦截器),轻松处理请求与响应额外需求(例:请求失败重试、响应内容重定向等等)
2.准备阶段
step1: 添加网络访问权限
在 AndroidManifest.xml 中添加
<uses-permission android:name="android.permission.INTERNET" />
step2: 添加依赖
在 app/build.gradle 中添加
implementation 'com.squareup.okhttp3:okhttp:4.9.0'
implementation 'com.squareup.okhttp3:logging-interceptor:4.9.0'
implementation 'com.google.code.gson:gson:2.8.5'
step3: 初始化
val client:OkHttpClient  = OkHttpClient.Builder()    //builder构造者设计模式
        .connectTimeout(10, TimeUnit.SECONDS) //连接超时时间
        .readTimeout(10, TimeUnit.SECONDS)
        .writeTimeout(10, TimeUnit.SECONDS)  //写超时,也就是请求超时
        .build()
Tips:
- object 对象的方法调用不用实例化,class 对象的方法调用需要实例化
- object 对象在 APP 整个生命周期只有一份
3. GET 请求
- Android 分为主线程 和 子线程
- 主线程:APP 一启动后,Android framework 层会启动一个线程,主线程(UI 线程)
- 子线程 例如 new Thread().start()
3.1 同步 GET 请求
同步 GET 的意思是一直等待 http 请求, 直到返回了响应. 在这之间会阻塞线程, 所以同步请求不能在 Android 的主线程中执行, 否则会报错 NetworkMainThreadException.
发送同步 GET 请求很简单:
- 创建 OkHttpClient 实例 client
- 通过 Request.Builder 构建一个 Request 请求实例 request
- 通过 client.newCall(request)创建一个 Call 的实例
- Call 的实例调用 execute 方法发送同步请求
- 请求返回的 response 转换为 String 类型返回
object FirstOKHttp{
    val client:OkHttpClient = OkHttpClient.Builder()  //builder构造者设计模式
        .connectTimeout(10 , TimeUnit.SECONDS) //连接超时时间
        .readTimeout(10 , TimeUnit.SECONDS)    //读取超时
        .writeTimeout(10 , TimeUnit.SECONDS)   //写超时
        .build()

    //同步请求
    fun get(url : String){
        //子线程  为了不让等待响应时影响整个app 一般放在子线程里执行
        Thread(Runnable {
            //构建请求体
            val request:Request = Request.Builder().url(url).build()
            //构造请求对象
            val call: Call = client.newCall(request)
            //发起同步请求execute——同步执行
            val response = call.execute()
            //execute执行完后
            val body = response.body?.string()
            Log.e("OkHttp","get response ${body}")
        }).start()
    }

}
3.2 异步 GET 请求
- 异步请求的步骤和同步请求类似,只是调用了 Call 的 enqueue 方法异步请求,结果通过回调 Callback 的 onResponse 方法及 onFailure 方法处理。
//异步请求  能够在主线程
fun getAsync(url : String){
    //构建请求体
    val request:Request = Request.Builder().url(url).build()
    //构造请求对象
    val call: Call = client.newCall(request)
    //发起异步请求enqueue——异步执行无返回值
    call.enqueue(object :Callback{
        //响应失败
        override fun onFailure(call: Call, e: IOException) {
            Log.e("OkHttp","get response ${e.message}")
        }

        //响应成功
        override fun onResponse(call: Call, response: Response) {
            val body = response.body?.string()
            Log.e("OkHttp","get response ${body}")
        }
    })
}
- 总结:
- 看了两种不同的 Get 请求,基本流程都是先创建一个 OkHttpClient 对象,然后通过 Request.Builder()创建一个 Request 对象,OkHttpClient 对象调用 newCall()并传入 Request 对象就能获得一个 Call 对象。
- 而同步和异步不同的地方在于 execute()和 enqueue()方法的调用
- 调用 execute()为同步请求并返回 Response 对象
- 调用 enqueue()方法测试通过 callback 的形式返回 Response 对象
注意:无论是同步还是异步请求,接收到 Response 对象时均在子线程中,onFailure,onResponse 的回调是在子线程中的,我们需要切换到主线程才能操作 UI 控件
Tips: 网络请求处理明文请求, 在 AndroidManifest.xml 中添加
<application
    android:usesCleartextTraffic="true"
    ...>
4.POST 请求
- POST 请求与 GET 请求不同的地方在于 Request.Builder 的 post()方法,post()方法需要一个 RequestBody 的对象作为参数
4.1 同步 POST 请求
//同步post请求 不能在主线程中使用
fun post(){
    //表单提交
    val body = FormBody.Builder()
        .add("userId","1600932269")
        .add("tagId","71")
        .build()
    val request:Request =
        Request.Builder().url("$BASE_URL/tag/toggleTagFollow")
            .post(body)
            .build()
    val call = client.newCall(request)

    Thread(Runnable {
        val response = call.execute()
        Log.e("OKHTTP POST" , "post response ${response.body?.string()}")
    }).start()
}
4.2 异步 POST 请求(表单提交)
//异步POST 异步表单提交
fun postAsync(){
    //表单提交
    val body = FormBody.Builder()
        .add("userId","1600932269")
        .add("tagId","71")
        .build()
    val request:Request =
        Request.Builder().url("$BASE_URL/tag/toggleTagFollow")
            .post(body)
            .build()
    val call = client.newCall(request)

    val response = call.enqueue(object :Callback{
        override fun onFailure(call: Call, e: IOException) {
            Log.e("OKHTTP POST" , "post onFailure ${e.message}")
        }

        override fun onResponse(call: Call, response: Response) {
            Log.e("OKHTTP POST" , "post onResponse ${response.body?.string()}")
        }
    })
}
异步表单文件上传
- Android6.0 及以后,读取外部存储卡的文件需要动态申请权限
fun postAsyncMultipart(context:Context){
    //外部存储文件对象
    //Android6.0及以后,读取外部存储卡的文件需要动态申请权限
    val file = File(Environment.getDownloadCacheDirectory(),"test.jpg")
    if(!file.exists()){
        Toast.makeText(context,"文件不存在",Toast.LENGTH_SHORT).show()
        return
    }

    val body = MultipartBody.Builder()
        .addFormDataPart("key1","value1")
        .addFormDataPart("key2","value2")
            //后台接受参数的名称  要上传文件的本地文件名称
        .addFormDataPart(
            "file" ,
            "file.jpg",
            RequestBody.create("application/octet-stream".toMediaType(),file)
        )
        .build()

    val request:Request =
        Request.Builder().url("接口也是需要支持文件上传才可以使用")
            .post(body)
            .build()

    val call = client.newCall(request)
    call.enqueue(object :Callback{
        override fun onFailure(call: Call, e: IOException) {
            Log.e("OKHTTP POST" , "postAsyncMultipart onFailure ${e.message}")
        }

        override fun onResponse(call: Call, response: Response) {
            Log.e("OKHTTP POST" , "postAsyncMultipart onResponse ${response.body?.string()}")
        }
    })
}
异步提交字符串
//传入的数据不是key,value 而是 字符串
fun postAsyncString(){
    //字符串可以是纯文本也可以是Json类型的字符串
    //JSON类型的字符串
    val applicationJSON = "application/json;charset=utf-8".toMediaType()
    val jsonObj = JSONObject()
    jsonObj.put("key1","value1")
    jsonObj.put("key2",120)
    //val body = RequestBody.create(applicationJSON,jsonObj.toString())

    //纯文本类型
    val textPlain = "text/plain;charset=utf-8".toMediaType()
    val textObj = "username:username;password:password"
    val body =
        RequestBody.create(textPlain,jsonObj.toString())


    val request = Request.Builder()
        .url("${BASE_URL}")
        .post(body)
        .build()
    val call = client.newCall(request)

    call.enqueue(object :Callback{
        override fun onFailure(call: Call, e: IOException) {
            Log.e("OKHTTP","postAsyncString onFailure ${e.message}")
        }

        override fun onResponse(call: Call, response: Response) {
            Log.e("OKHTTP","postAsyncString onResponse ${response.body?.string()}")
        }

    })

}
5.拦截器
- 拦截器是 OkHttp 当中一个比较强大的机制,以解耦的形式可以监视、重写和重试调用请求
5.1 自定义拦截器 LoggingInterceptor
class LoggingInterceptor : Interceptor{
    //拦截
    override fun intercept(chain: Interceptor.Chain): Response {
        val time_start = System.nanoTime() //发出请求的时间戳
        val request = chain.request() //当前请求的request对象
        val response = chain.proceed(request) //当前请求的response对象

        val buffer = Buffer()
        request.body?.writeTo(buffer)
        val requestBodyStr = buffer.readUtf8()
        //请求接口和请求接口值所携带的参数
        Log.e(
            "OKHTTP" ,
            String.format("Sending request %s with params %s",request.url,requestBodyStr)
        )

        //响应流里面的数据 一但使用response.body?.string() 今后就不可拿response读取它的响应流这是由于OKHttp的工作原理决定的
        val businessData = response.body?.string()?:"response body null"
        val mediaType = response.body?.contentType()
        val newBody = businessData.toResponseBody(mediaType)
        val newResponse = response.newBuilder().body(newBody).build()

        val time_end = System.nanoTime()

        //响应接口 响应时间(1e6是科学计数法) 响应流数据
        Log.e(
            "OKHTTP",
            String.format("Received response for %s in $.1fms >>> %s",request.url,(time_end-time_start)/1e6,businessData)
        )

        return newResponse
    }

}
- 使用、
private val client:OkHttpClient = OkHttpClient.Builder()  //builder构造者设计模式
    .connectTimeout(10 , TimeUnit.SECONDS) //连接超时时间
    .readTimeout(10 , TimeUnit.SECONDS)    //读取超时
    .writeTimeout(10 , TimeUnit.SECONDS)   //写超时
    .addInterceptor(LoggingInterceptor()) //拦截器
    .build()
5.2 内置拦截器 HttpLoggingInterceptor
- HttpLoggingInterceptor 是 OkHttp 内置的一个拦截器,可以打印出请求和响应的信息,包括请求行、请求头、响应行、响应头、响应体等信息
private val client:OkHttpClient
init{
    val httpLoggingInterceptor = HttpLoggingInterceptor()
    httpLoggingInterceptor.setLevel(HttpLoggingInterceptor.Level.BODY)

    client= OkHttpClient.Builder()  //builder构造者设计模式
        .connectTimeout(10 , TimeUnit.SECONDS) //连接超时时间
        .readTimeout(10 , TimeUnit.SECONDS)    //读取超时
        .writeTimeout(10 , TimeUnit.SECONDS)   //写超时
        .addInterceptor(httpLoggingInterceptor) //拦截器
        .build()
}
6.使用 Gson 来解析网络请求响应
- Gson 是 Google 提供的一个 Java 库,可以将 Java 对象转换成 JSON 字符串,也可以将 JSON 字符串转换成 Java 对象
- 添加依赖
implementation 'com.google.code.gson:gson:2.8.6'
6.1 JSON 与对象
- 将 JSON 转换为对象
val json ="{\"uid\":\"00001\",\"userName\":\"Freeman\",\"telNumber\":\"13000000000\"}"

//Gson对象啊
val gson = Gson()
val account = gson.fromJson<Account>(json,Account::class.java)
println(account.toString())
- 将对象转换为 JSON
//1.2将对象转换为JSON
val accountJson = gson.toJson(account)
println("toJson : $accountJson")
6.2 JSON 与 List
- 将 JSON 转换为 List
//2.1将JSON转换成集合
val jsonList= "[{\"uid\":\"00001\",\"userName\":\"Freeman\",\"telNumber\":\"13000000000\"}" +
        ",{\"uid\":\"00002\",\"userName\":\"oooo\",\"telNumber\":\"12000000000\"}]"

val accountList:List<Account> =  gson.fromJson(jsonList , object :TypeToken<List<Account>>(){}.type)
println("fromJson to list : ${accountList.size}")
- 将 List 转换为 JSON
//2.2将集合转换成JSON
val accountJsonList = gson.toJson(accountList)
println("list to json : $accountJsonList")
注意:Gson 在解析 JSON 时,如果 JSON 中的字段在 Java 对象中不存在,Gson 会忽略该字段,不会抛出异常
提示:
- var 关键字是 variable 的简称,表示该变量可以被修改,,这种声明变量的方式和 java 中声明变量的方式一样。
- val 关键字是 value 的简称,表示该变量一旦赋值后不能被修改,相当于 java 中的 final 变量。一个 val 创建的时候必须初始化,因为以后不能被改变。
- {}对象形式 json 字串 []集合形式的 json 字串
JsonToKotlin 插件
- 通过 JsonToKotlin 插件可以将 JSON 字符串转换为 Kotlin 对象,这样就不用手动创建 Kotlin 对象了
- 下载地址
RESTFUL 网路请求框 Retrofit
- Retrofit 是一个高质量高效率的 HTTP 请求库。Retrofit 内部依赖于 OkHttp,它将 OKHttp 底层的代码和细节都封装了起来,功能上做了更多的扩展,比如返回结果的自动解析数据模型,网络引擎的切换,拦截器。
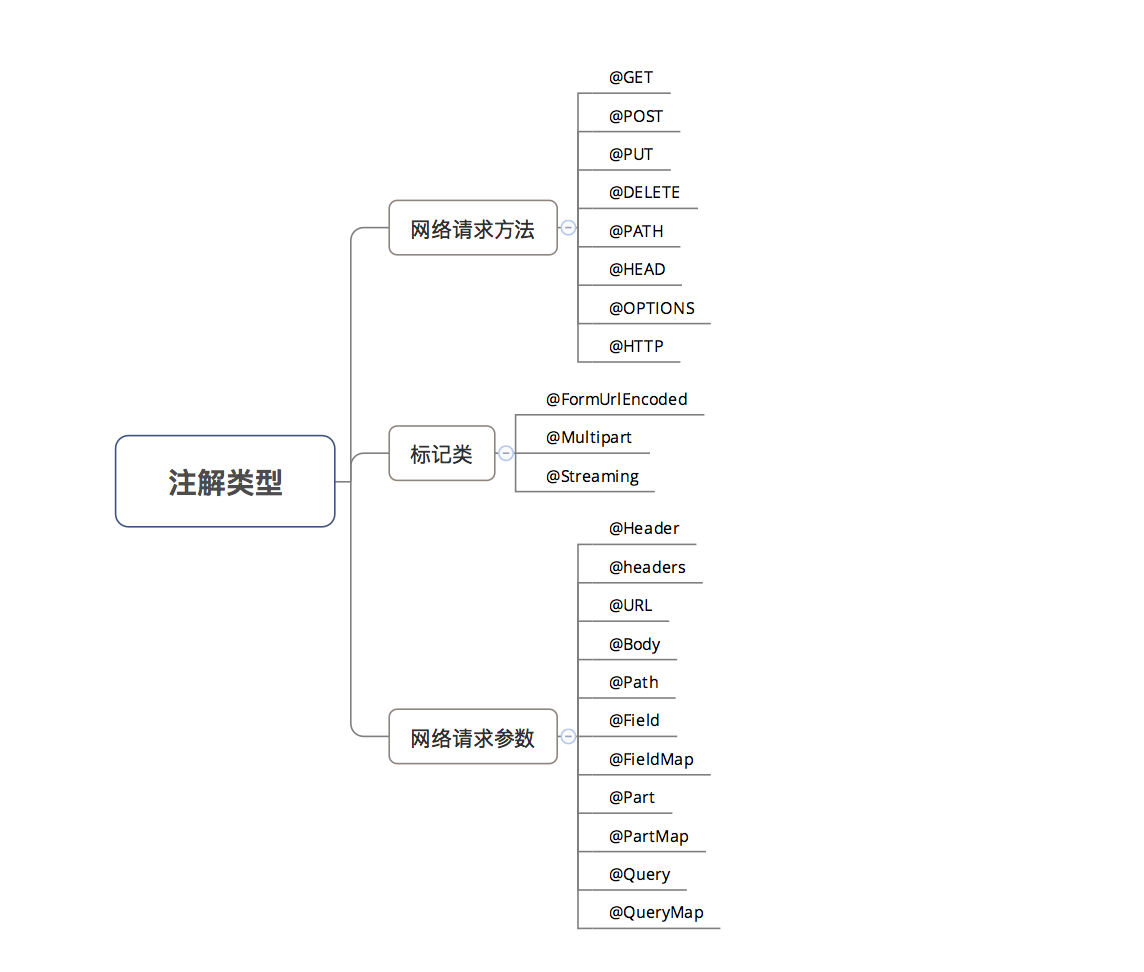
1.注解
- retrofit 注解驱动型上层网络请求框架,使用注解来简化请求,大体分为以下几类:
- 用于标注网络请求方式的注解
- 标记网络请求参数的注解
- 用于标记网络请求和响应格式的注解
1.1 请求方法注解
| 注解 | 说明 |
|---|---|
| @GET | 用于发送 get 请求 |
| @POST | 用于发送 post 请求 |
| @PUT | 用于发送 put 请求 |
| @DELETE | 用于发送 delete 请求 |
| @HEAD | 用于发送 head 请求 |
| @OPTIONS | 用于发送 options 请求 |
| @PATCH | 用于发送 patch 请求 |
| @HTTP | 用于发送自定义请求,需要指定 method、path、hasBody 等属性,method 为请求方式,path 为请求路径,hasBody 为是否有请求体 |
| @HTTP(method = "GET", path = "users/{user}/repos", hasBody = false) | 用于发送自定义请求,指定请求方式为 GET,请求路径为 users/{user}/repos,没有请求体 |
1.2 请求头注解
- 既可以标记在方法上面也可以标记在参数里面
注解 说明 @Headers 用于标记请求头信息,可以标记在方法上面也可以标记在参数里面 @Header 用于标记请求头信息,只能标记在方法参数里面
1.3 请求参数注解
| 注解 | 说明 |
|---|---|
| @Path | 用于替换请求路径中的占位符,如:@GET("users/{user}/repos") |
| @Query | 用于拼接在请求路径后面的查询参数,如:@GET("users/repos") |
| @QueryMap | 用于拼接在请求路径后面的查询参数,如:@GET("users/repos") |
| @Field | 用于 post 请求的表单字段,如:@POST("users/repos") |
| @FieldMap | 用于 post 请求的表单字段,如:@POST("users/repos") |
| @Body | 用于 post 请求的请求体,如:@POST("users/repos") |
| @Part | 用于 post 请求的表单字段,如:@POST("users/repos") |
| @PartMap | 用于 post 请求的表单字段,如:@POST("users/repos") |
| @Url | 用于替换请求路径,如:@GET("users/repos") |
1.4 请求和响应格式注解
| 注解 | 说明 |
|---|---|
| @FormUrlEncoded | 用于标记表单提交,如:@POST("users/repos") |
| @Multipart | 用于标记表单提交,如:@POST("users/repos") |
| @Streaming | 用于标记响应体为流,如:@GET("users/repos") |
2 开始使用
2.1 添加依赖
implementation 'com.squareup.retrofit2:retrofit:2.9.0'
implementation 'com.squareup.retrofit2:converter-gson:2.9.0'
2.2 创建 Retrofit 实例
object FirstRetrofit {
    //OkHttpClient 对象
    private val okClient:OkHttpClient = OkHttpClient.Builder() //builder构建者设计模式
        .connectTimeout(10,TimeUnit.SECONDS)   //连接超时时间
        .readTimeout(10,TimeUnit.SECONDS)      //读取超时
        .writeTimeout(10,TimeUnit.SECONDS)     //写超时
        .addInterceptor(LoggingInterceptor())         //拦截器
        .build()

    //初始化
    private val retrofit:Retrofit = Retrofit.Builder()
        .client(okClient)    //配置OkHttp网络请求框架的对象
        .baseUrl("http://123.56.232.18:8080/serverdemo/")  //网络请求的域名
        .addConverterFactory(GsonConverterFactory.create())   //数据转换适配器
        .build()

    //发起网络请求
    //public <T> T create(final Class<T> service)  java类型
    fun <T> create(clazz: Class<T>):T{
        return retrofit.create(clazz)
    }
}

//网络请求接口
interface ApiService{
    //@Query 的 encoded发起网络请求是要不要对接口进行编码(防止中文乱码)
    //@Query(value = "userId", encoded = true) 是用来修饰 userId:String
    @GET(value = "user/query")
    fun queryUser(@Query(value = "userId", encoded = true) userId:String):Call<UserResponse>
}
2.3 发起网络请求
- 异步用 enqueue(),同步用 execute()
  val apiService = FirstRetrofit.create(ApiService::class.java)
  apiService.queryUser("1600933269").enqueue(object :Callback<UserResponse>{
      override fun onResponse(call: Call<UserResponse>, response: Response<UserResponse>) {
          Log.e("Retrofit",response.body()?.toString()?:"response is null")
      }

      override fun onFailure(call: Call<UserResponse>, t: Throwable) {
          Log.e("Retrofit",t.message?:"unknown reason")
      }
  })
tips: onResponse 和 onFailure 的回调都是在主线程里面 可以直接操控 UI 控件
请求方法定义
- 请求方法定义的时候,可以使用 Retrofit 的注解来标记请求的方式、请求的路径、请求的参数等信息
//网络请求接口
interface ApiService{
    //@Query 的 encoded发起网络请求是要不要对接口进行编码(防止中文乱码)
    //@Query(value = "userId", encoded = true) 是用来修饰 userId:String
    @GET(value = "user/query")
    fun queryUser(@Query(value = "userId", encoded = true) userId:String):Call<UserResponse>

    //使用@Headers添加多个请求头
    @Headers("User-Agent:android", "apikey:123456789")
    @GET(value = "user/query")
    fun queryUser1(@Query(value = "userId" , encoded = true) userId: String):Call<UserResponse>

    //多个参数的情况下可以使用@QueryMap,但只能用在GET请求上
    @GET(value = "user/query")
    fun queryUser2(@QueryMap(encoded = true) queryMap: Map<String?, String?>):Call<UserResponse>

    /**
     * 很多情况下,我们需要上传json格式的数据。当我们注册新用户的时候,因为用户注册时的数据相对较多
     * 并可能以后会变化,这时候,服务端可能要求我们上传json格式的数据。此时就要@Body注解来实现。
     * 直接传入实体,它会自行转化成Json, @Body只能用在POST请求上
     *
     * 字符串提交
     */
    @POST("user/update")
    fun userUpdate(@Body post: User):Call<UserResponse>

    /**
     * 表单提交(键值对提交)
     * 多用于post请求中表单字段,Filed和FieldMap需要FormUrlEncoded结合使用
     */
    @POST()
    @FormUrlEncoded
    fun executePost(@FieldMap map:Map<String , User>):Call<UserResponse>

    /**
     * 表单上传文件(键值对提交、同时上传文件)
     */
    @Multipart
    @FormUrlEncoded
    @POST("upload/upload")
    fun register(
        @Field("openId") openId:String,
        @PartMap map:Map<String? , MultipartBody.Part>
    ):Call<UserResponse>

}